Index
Building the ETL Processing Pipeline
This section explains how to construct a processing pipeline in the ETL workflow using the prepare_final_signals function. This function applies your custom processing logic to data fetched in the previous step.
Step-by-Step Guide
- Import Necessary Functions:
Start by importing the
prepare_final_signalsfunction and your custom data_fetcher.
- Run the Pipeline: Execute the pipeline with the following call:
➡️ In this example:
- All files starting with
"demo"are processed under the"demographic"pipeline (will be explained next). - All files are read in a single batch (
batch_size=0)`. override="n"prevents re-running an already completed process.
Important Notes:
- You should repeat this process for each data type.
- Best Practice for PID Mapping: Start by processing demographic signals like BDATE and GENDER. This is because if patient IDs (pid) are strings, the ETL will create a numeric-to-string mapping based on these demographic signals. This mapping is then used for all other signals, ensuring consistent pid values across the entire dataset. More details on the pipeline can be seen next Higher-Level Pipeline Flow
- Use the
start_write_batchparameter when multiple pipelines write to the same output signals. This ensures unique batch indices and prevents overwrites - A single fetcher can feed multiple pipelines by specifying comma-separated names. For example:
This sends demographic data to both gender.py and byear.py.
Defining Processing Logic
Each pipeline automatically looks for a processing script named after the pipeline (e.g., demographic.py).
This script must be located in the signal_processings folder alongside your main code.
Inside the Script
- Input: A
DataFrame dffrom the fetcher.- You can also use
workdiras WORKDIR folder path andsig_typesand object with signal type definitions. A usefull function is to retrived other processed signal, in that exampleBDATEwithdf_bdate = load_final_sig(workdir, sig_types, "BDATE")
- You can also use
- Output: A transformed DataFrame in the required format, still called
df. - Any
printstatements will be captured in a log file.
A Note on Signal Processing:
- If the DataFrame contains a
signalcolumn, the system generates a mapping file for easier renaming and mapping. Please refer to Signal Mapping. - If
signalis non-null, processing is grouped by signal names instead of pipeline names. - Each signal belongs to hierarchical groups (tags and aliases). Example:
- signal
"BDATE"is linked todemographic,singleton, anddate. "Hemoglobin"belongs tolabsandcbc
➡️ Processing order:
If a dedicated script exists (e.g., Hemoglobin.py), it will be used.
Otherwise, the system looks from the most specific to least specific tag (e.g., first cbc.py, then labs.py).
Link to File Definition of All Signals
Debugging
To debug, add breakpoint() in your script. No changes to ETL infrastructure code are required.
Required Output Format
The final DataFrame must include:
pid: Patient identifier (already required in fetching step)signal: The name of the signal (e.g., 'GENDER', 'Hemoglobin'). This must be a recognized signal. The system will provide an error with instructions if a signal is unknown (How to define a new signal if needed).time_X: Time channels, where X is an index. These should be stored as integers in YYYYMMDD format.value_X: Value channels, where X is an index. These can be float, integer, or string (for categorical data)
❌ Any other columns will be ignored during the final loading process.
✅ Column order doesn’t matter - the ETL system arranges them automatically.
Special Cases
- For categorical signals, see Categorical Signals
- For signals that needs unit conversion, this guide can be helpful: Unit Conversion
Example Processing Code
Here's an example of the code you would write inside the demographic.py file to process a DataFrame and create a GENDER signal.
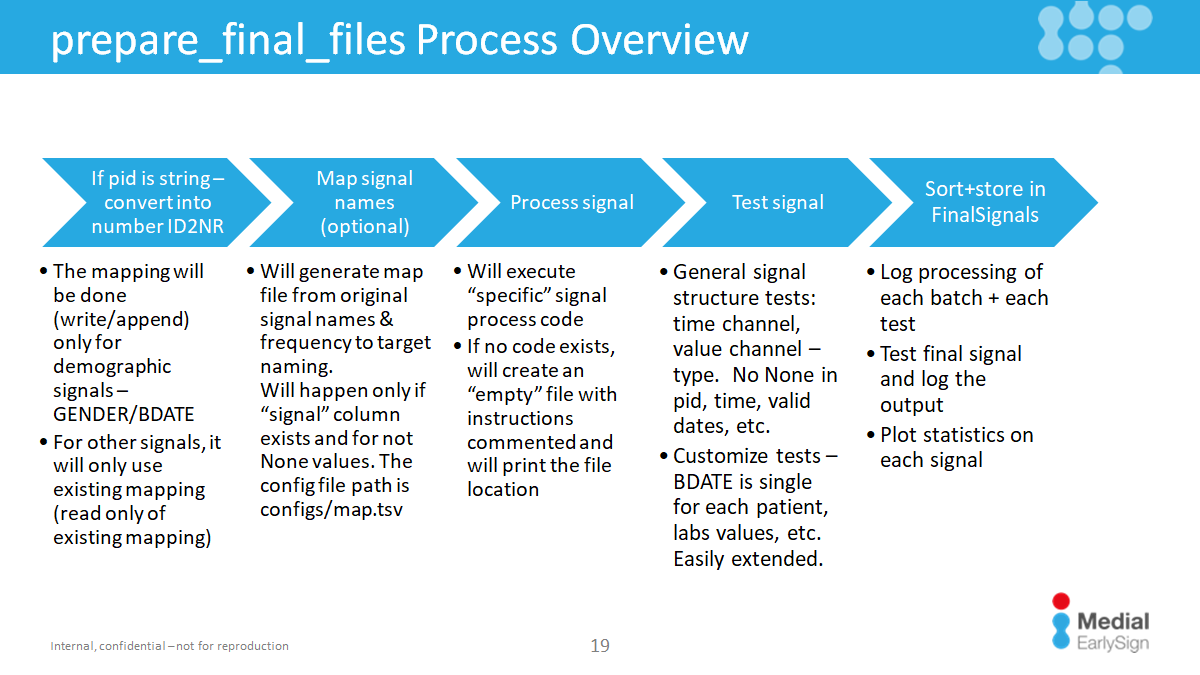
Higher-Level Pipeline Flow
Every pipeline includes the following stages:
-
PID Mapping:
- Convert non-numeric IDs to numeric.
- Mapping stored in
[WORK_DIR]/FinalSignals/ID2NR. - Demographic signals (signals with "demographic" tag) create the mapping; all others join on it.
-
Signal Mapping:
- If
signalcolumn exists and not-null, optional name mappings can be done usingconfigs/map.tsv. - File lists source → destination mappings, ordered by frequency. Empty lines without destination value will be ignored in the mapping.
- If
-
Data Transformation:
- Transform the DataFrame to the final format.
This is the process unit that we wrote here in the ETL.
- Transform the DataFrame to the final format.
-
Testing:
- Run automatic format tests, followed by deeper tests (e.g., lab distributions).
- See Extending and adding tests
-
Storing:
- Sort and save the processed data in
[WORK_DIR]/FinalSignals.
- Sort and save the processed data in
Next Step: Prepare Dicts if needed
If your project requires client-specific dictionaries, follow this guide: Prepare Special Dicitonaries
Once you have you finished, follow this guide to finalize the loading